03/ PAINT CORRECTION
Paint correction
done properly
Swirl marks, holograms, light scratches, they're not on your paint, they're cut into it. Real correction is multi-stage clear coat refinement; measured passes, proper lighting, dual action machines. Not a polish. Not a buff. The foundation of every great finish
Coolum Beach studio•Gtechniq authorised•Operating since 2008
What you're actually paying for
Most "polishes" don't fix the paint.
They hide it.
Paint correction is one of the most misunderstood services in detailing. Here's what it actually does, and why the difference matters once you put a $1,500 ceramic coating on top of it
It's clear coat refinement, not buffing
Modern paint is two layers; colour underneath, clear coat on top. Defects live inside the clear coat. Real correction removes microscopic amounts of clear coat to level it back to a smooth, defect free surface. It's a measured process. Buffing is what happens when no one's measuring.
It removes what your eye sees in direct sun
Swirl marks. Holograms. Spiderweb cobwebbing. Water etching. Light scratches. Oxidation that turns black paint grey. If it's a defect in the clear coat, correction takes it out. Deeper scratches that have gone through to the colour layer aren't correctable, those need paintwork.
Most "detailers" make it worse
A rotary buffer in untrained hands burns through clear coat in seconds. Cheap all-in-one products fill swirl marks with silicone; they reappear after the first wash. The hologram pattern you see on cars after a "polish" is the signature of bad technique. Done wrong, correction permanently damages your paint.
The JETWASH process
Six stages.
Every car. No shortcuts.
Jack has been correcting paint on the Sunshine Coast since 2008. Every job follows the same disciplined sequence, because the only way to know exactly how much clear coat you've removed is to do it the same way every time.
- 01
Inspection under proper lighting
Before anything else, the paint goes under high intensity inspection lighting that reveals every swirl, hologram and scratch. Defects are mapped panel by panel. You can't fix what you can't see, and most studios don't have lights that show what's actually there.
ToolsInspection LEDs · magnification - 02
Decontamination wash
The paint is foamed, hand washed using the two bucket method, then chemically and mechanically decontaminated. Iron fallout remover lifts brake dust and rail dust out of the clear coat. A clay bar pulls out embedded contaminants you can feel with your fingertips. Polishing dirty paint is how holograms are born.
ToolspH-neutral foam · iron remover · clay bar - 03
Paint depth measurement
A digital paint thickness gauge measures clear coat depth at multiple points on every panel. Readings are documented. This is the step that determines how much correction is safely possible, and the step almost no other detailer on the Sunshine Coast does. If a panel has been resprayed or already corrected to the limit, we won't touch it. That's not a hedge, that's how clear coats stay intact.
ToolsDigital paint thickness gauge - 04
Multi-stage machine polish
The correction itself. Using a Rupes dual action polisher, paint is corrected in stages: a cutting compound on a firmer pad to remove defects, a refining polish to eliminate the haze the cut left behind, and a finishing polish on a soft pad to maximise gloss and remove final marring. Two-stage and three-stage corrections add additional refinement passes. Every panel is taped off, every pass is controlled, every section is inspected before moving on.
ToolsRupes dual action · cut/polish/finish compounds · pad system - 05
IPA wipe down
After polishing, every panel is wiped with an isopropyl alcohol solution. This strips off any polish oils and reveals the true correction underneath, no fillers, no glaze, no hidden defects. If something reappears after the IPA wipe, it gets re-corrected. This is the step that separates real correction from cosmetic polishing.
ToolsIPA solution · microfibre - 06
Final inspection
The car is re-inspected under multiple light sources; direct LED, daylight, and angled inspection lighting. Every panel is signed off. If you're going on to ceramic coating, the paint is now ready for application in its truest, most defect-free state. If correction is the end goal, this is the finish line.
ToolsMulti-source inspection lighting
Stages of correction
How deep should you go?
Not every car needs every stage. The right level depends on the condition of your paint, your goals (gloss, prep for ceramic, restoration), and how much clear coat you have to work with. Here's the breakdown
Stage 1
Single-stage
~1 day turnaround
Removes
Light swirl marks, hologram traces, light water spotting, mild oxidation. Around 70–80% defect removal.
Best for
New cars with dealer induced swirl, well maintained daily drivers, ceramic coated cars due for refresh.
Process
Single polishing pass with a refining compound that restores gloss without aggressive cutting.
Stage 2
Two-stage
1–2 day turnaround
Removes
Everything from Stage 1, plus medium swirls, light scratches, holograms, light water etching. Around 85–90% defect removal.
Best for
Used cars in average condition, prep before ceramic coating on moderately swirled paint, cars that have been "polished" elsewhere and now show holograms.
Process
Cutting compound to remove defects, then a refining polish to eliminate the haze and maximise gloss.
Stage 3
Three-stage
2–3 day turnaround
Removes
Everything from Stage 2, plus deeper RIDS within safe clear coat depth, severe oxidation, sanding marks. Up to ~95% defect removal.
Best for
Show cars, restoration projects, severely neglected paint, prep before high-end multi-year ceramic coating where the finish needs to be perfect.
Process
Heavy cut, refining pass, and a dedicated finishing polish on a soft pad for maximum gloss and zero residual marring.
All prices indicative and depend on vehicle size and paint condition. Final quote provided after paint inspection.
Real cars, real results
Before and after.
Drag to compare.
Every car below was corrected by Jack at the Coolum Beach studio. No filters, no editing, no staged photography. Pull the slider across to see the difference correction makes on the same panel under the same lighting
Case 01
"I thought I'd need a respray"
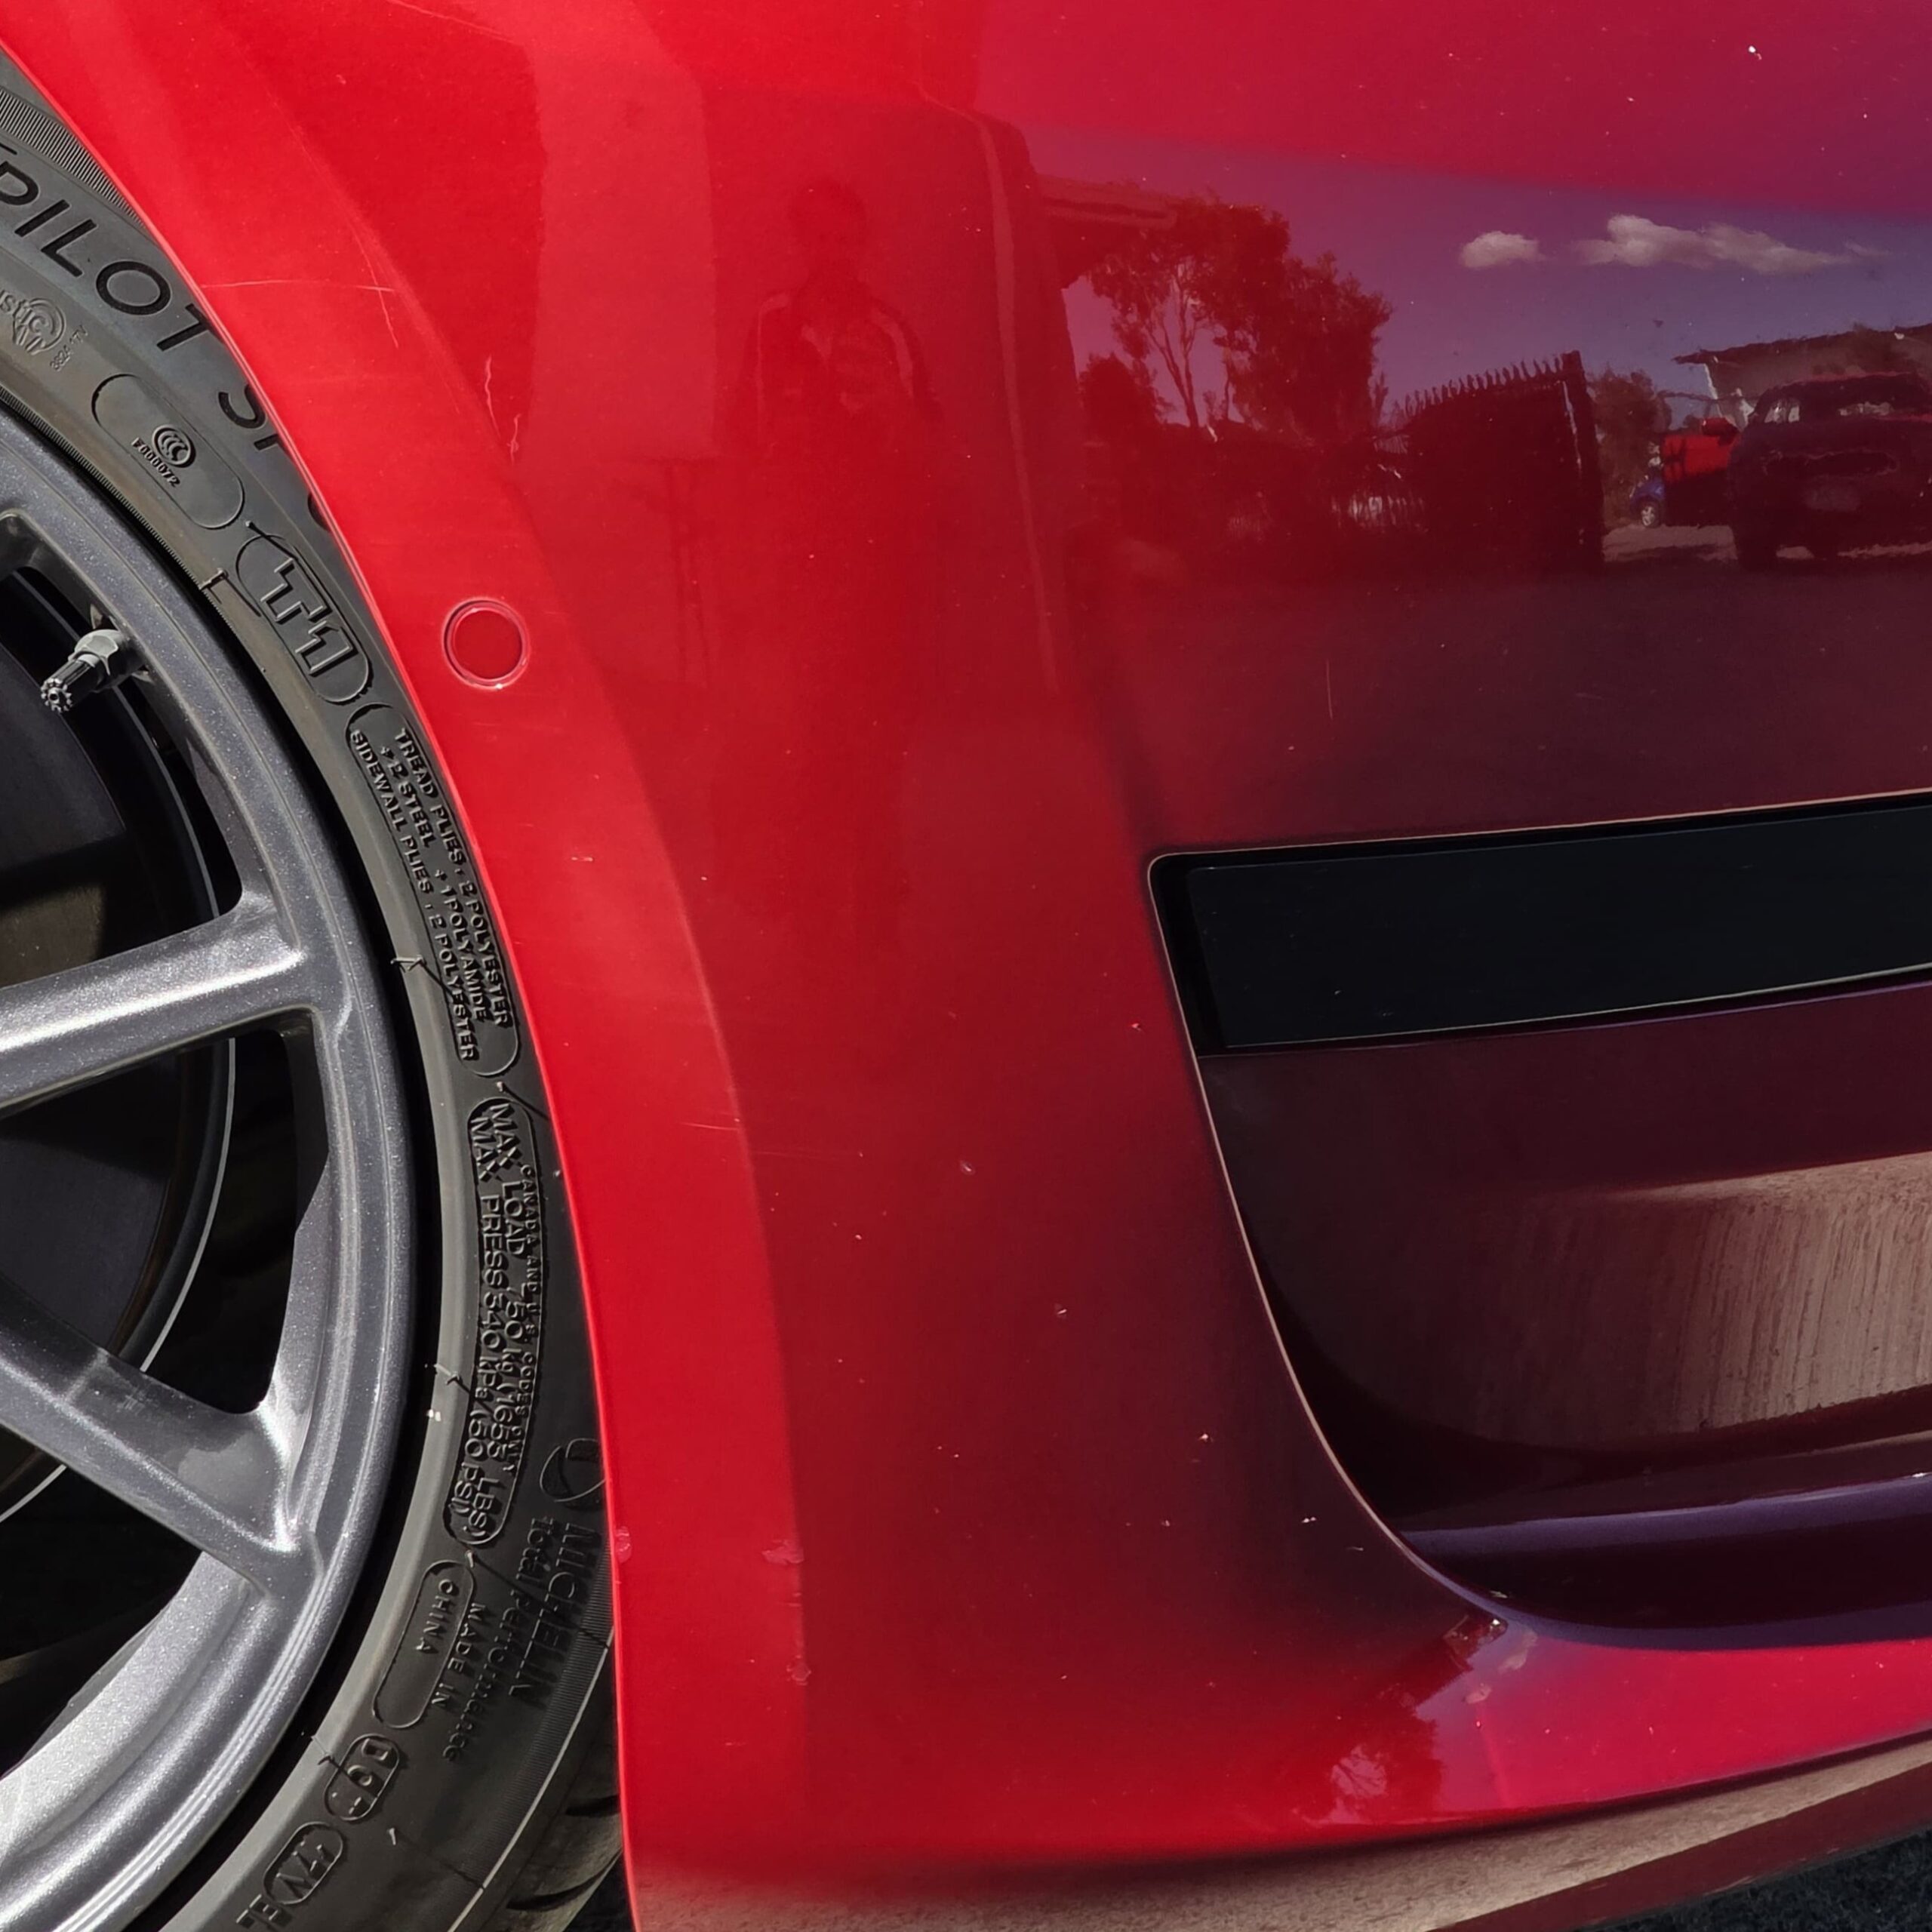
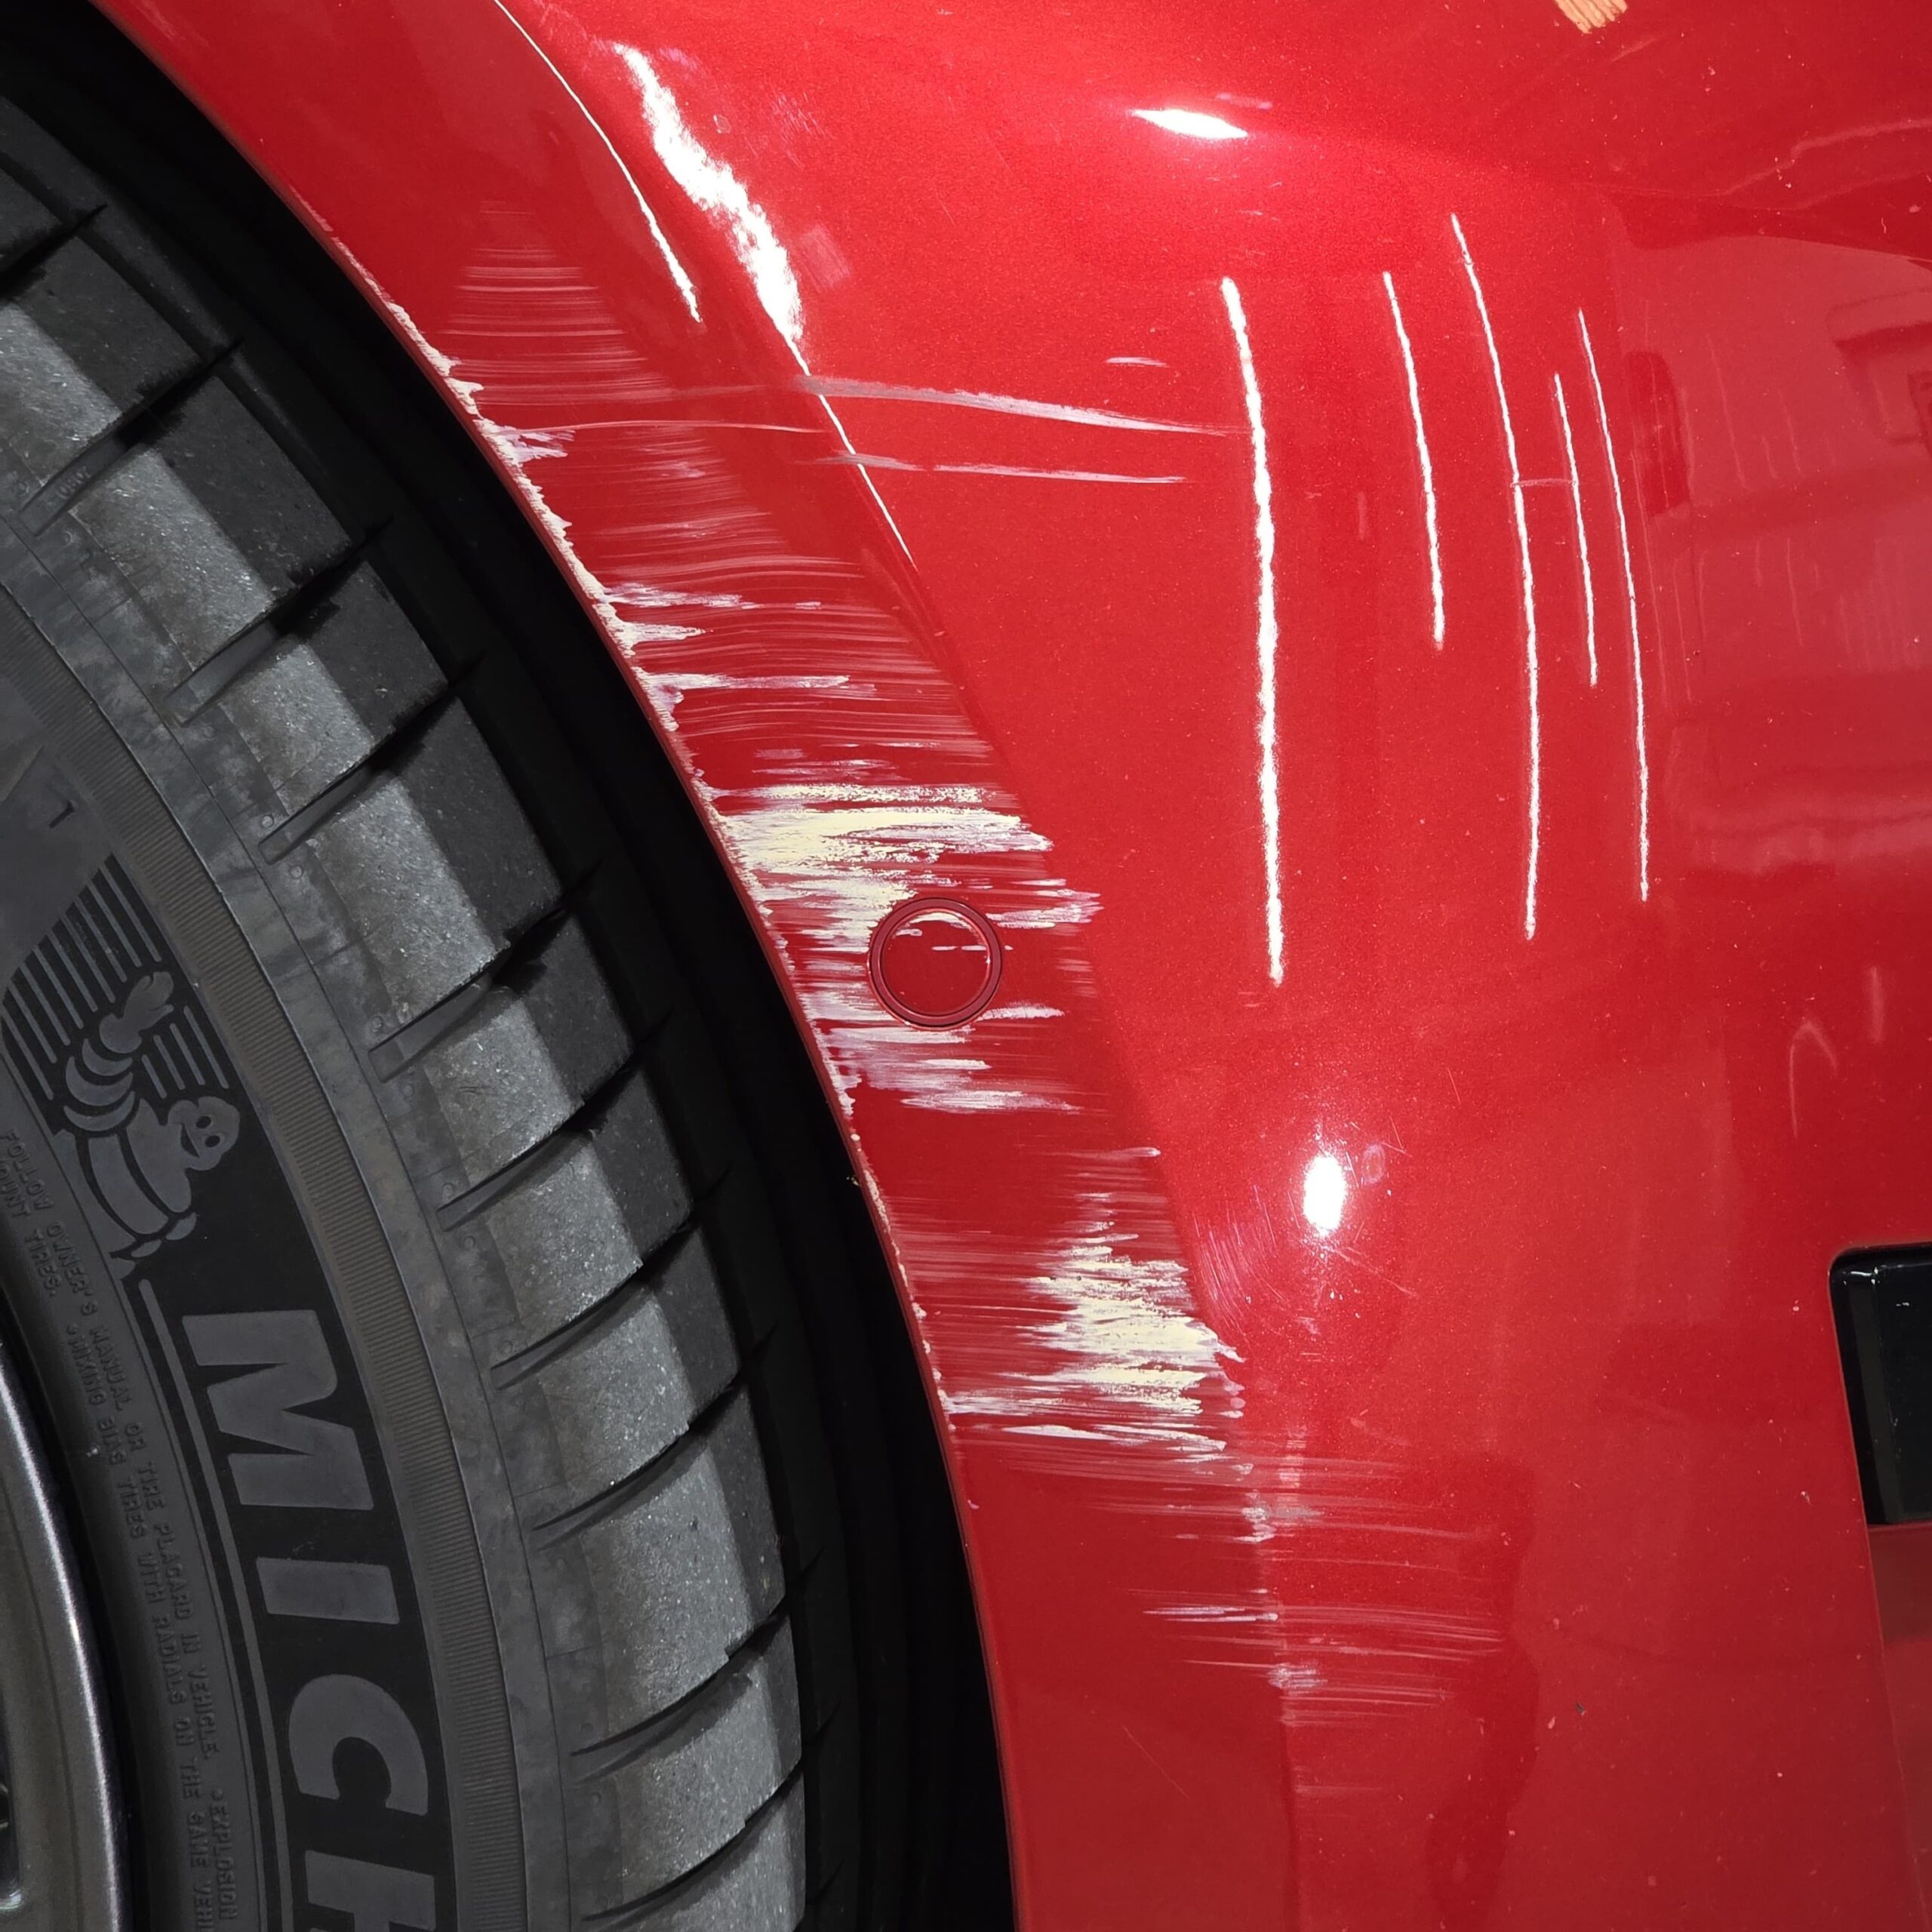
A Tesla Model 3 in red metallic, front quarter panel marked up with white scuff transfer and deep scratches after a tight encounter with something solid. The owner came in expecting to be quoted for paintwork. Paint depth checks confirmed the damage was in the clear coat only, and a multi-stage correction brought the panel back. No respray, no body shop, no insurance claim.
Case 02
Why your paint looks worse in the sun
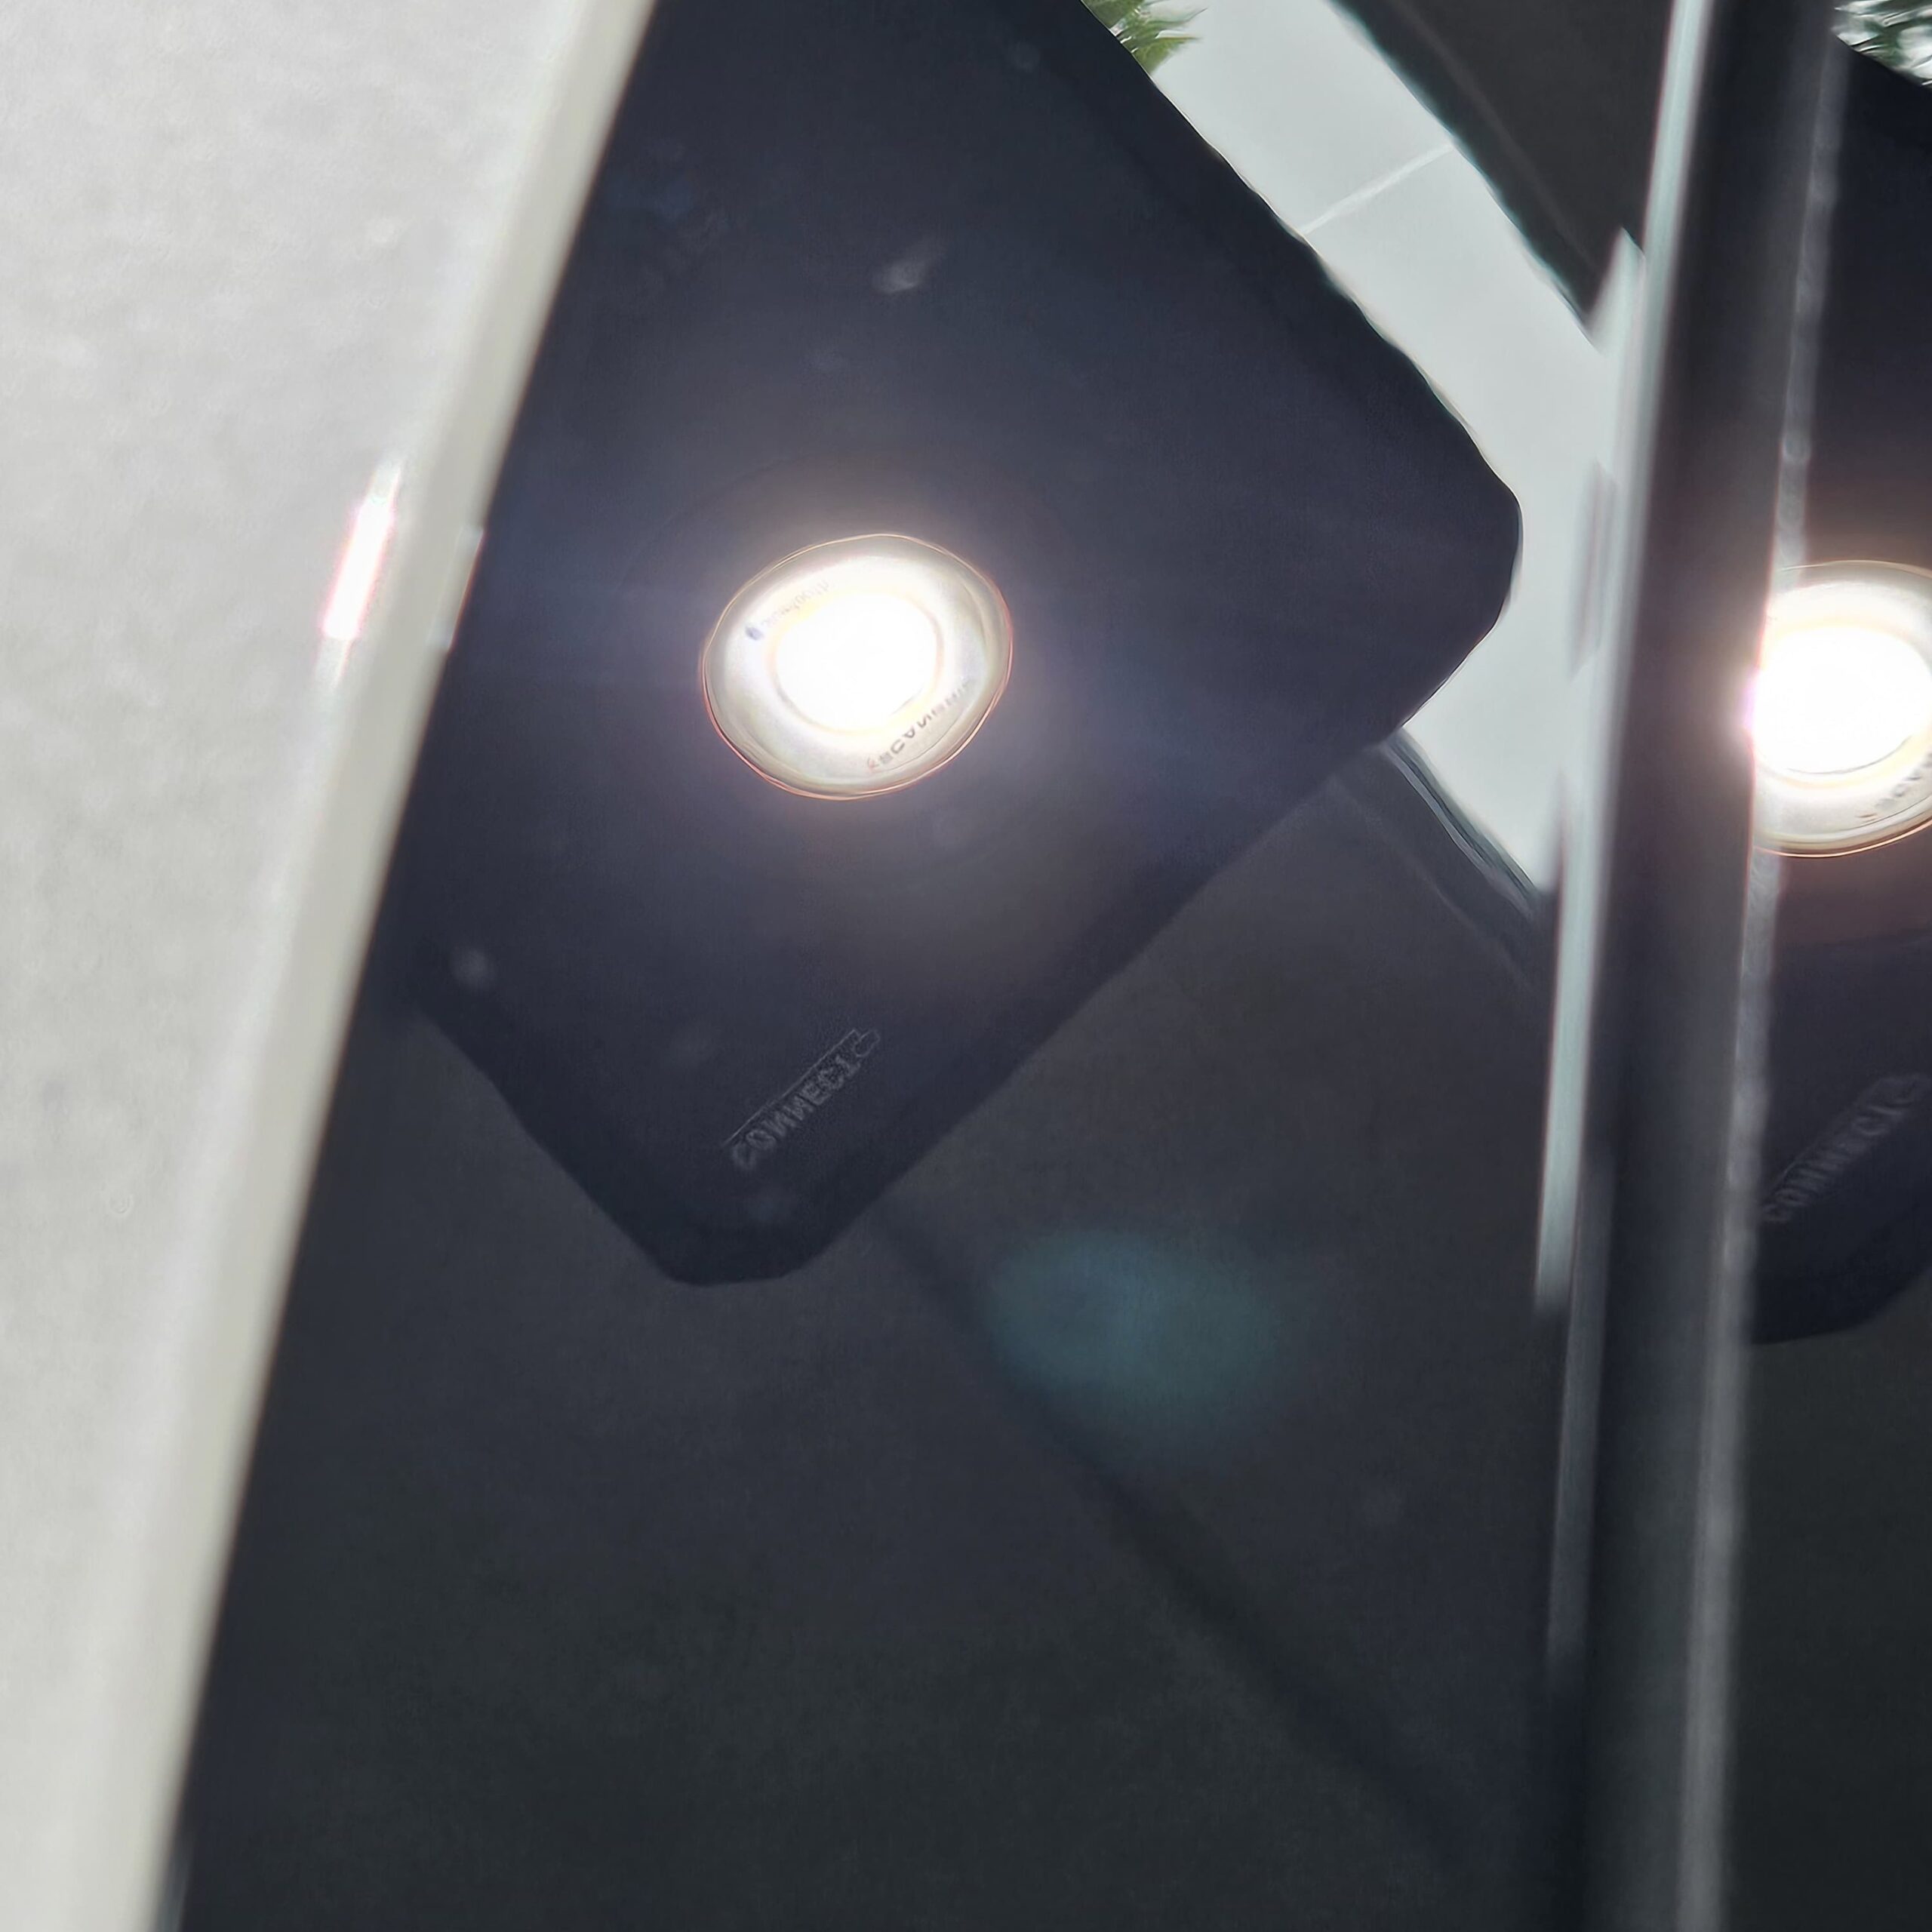
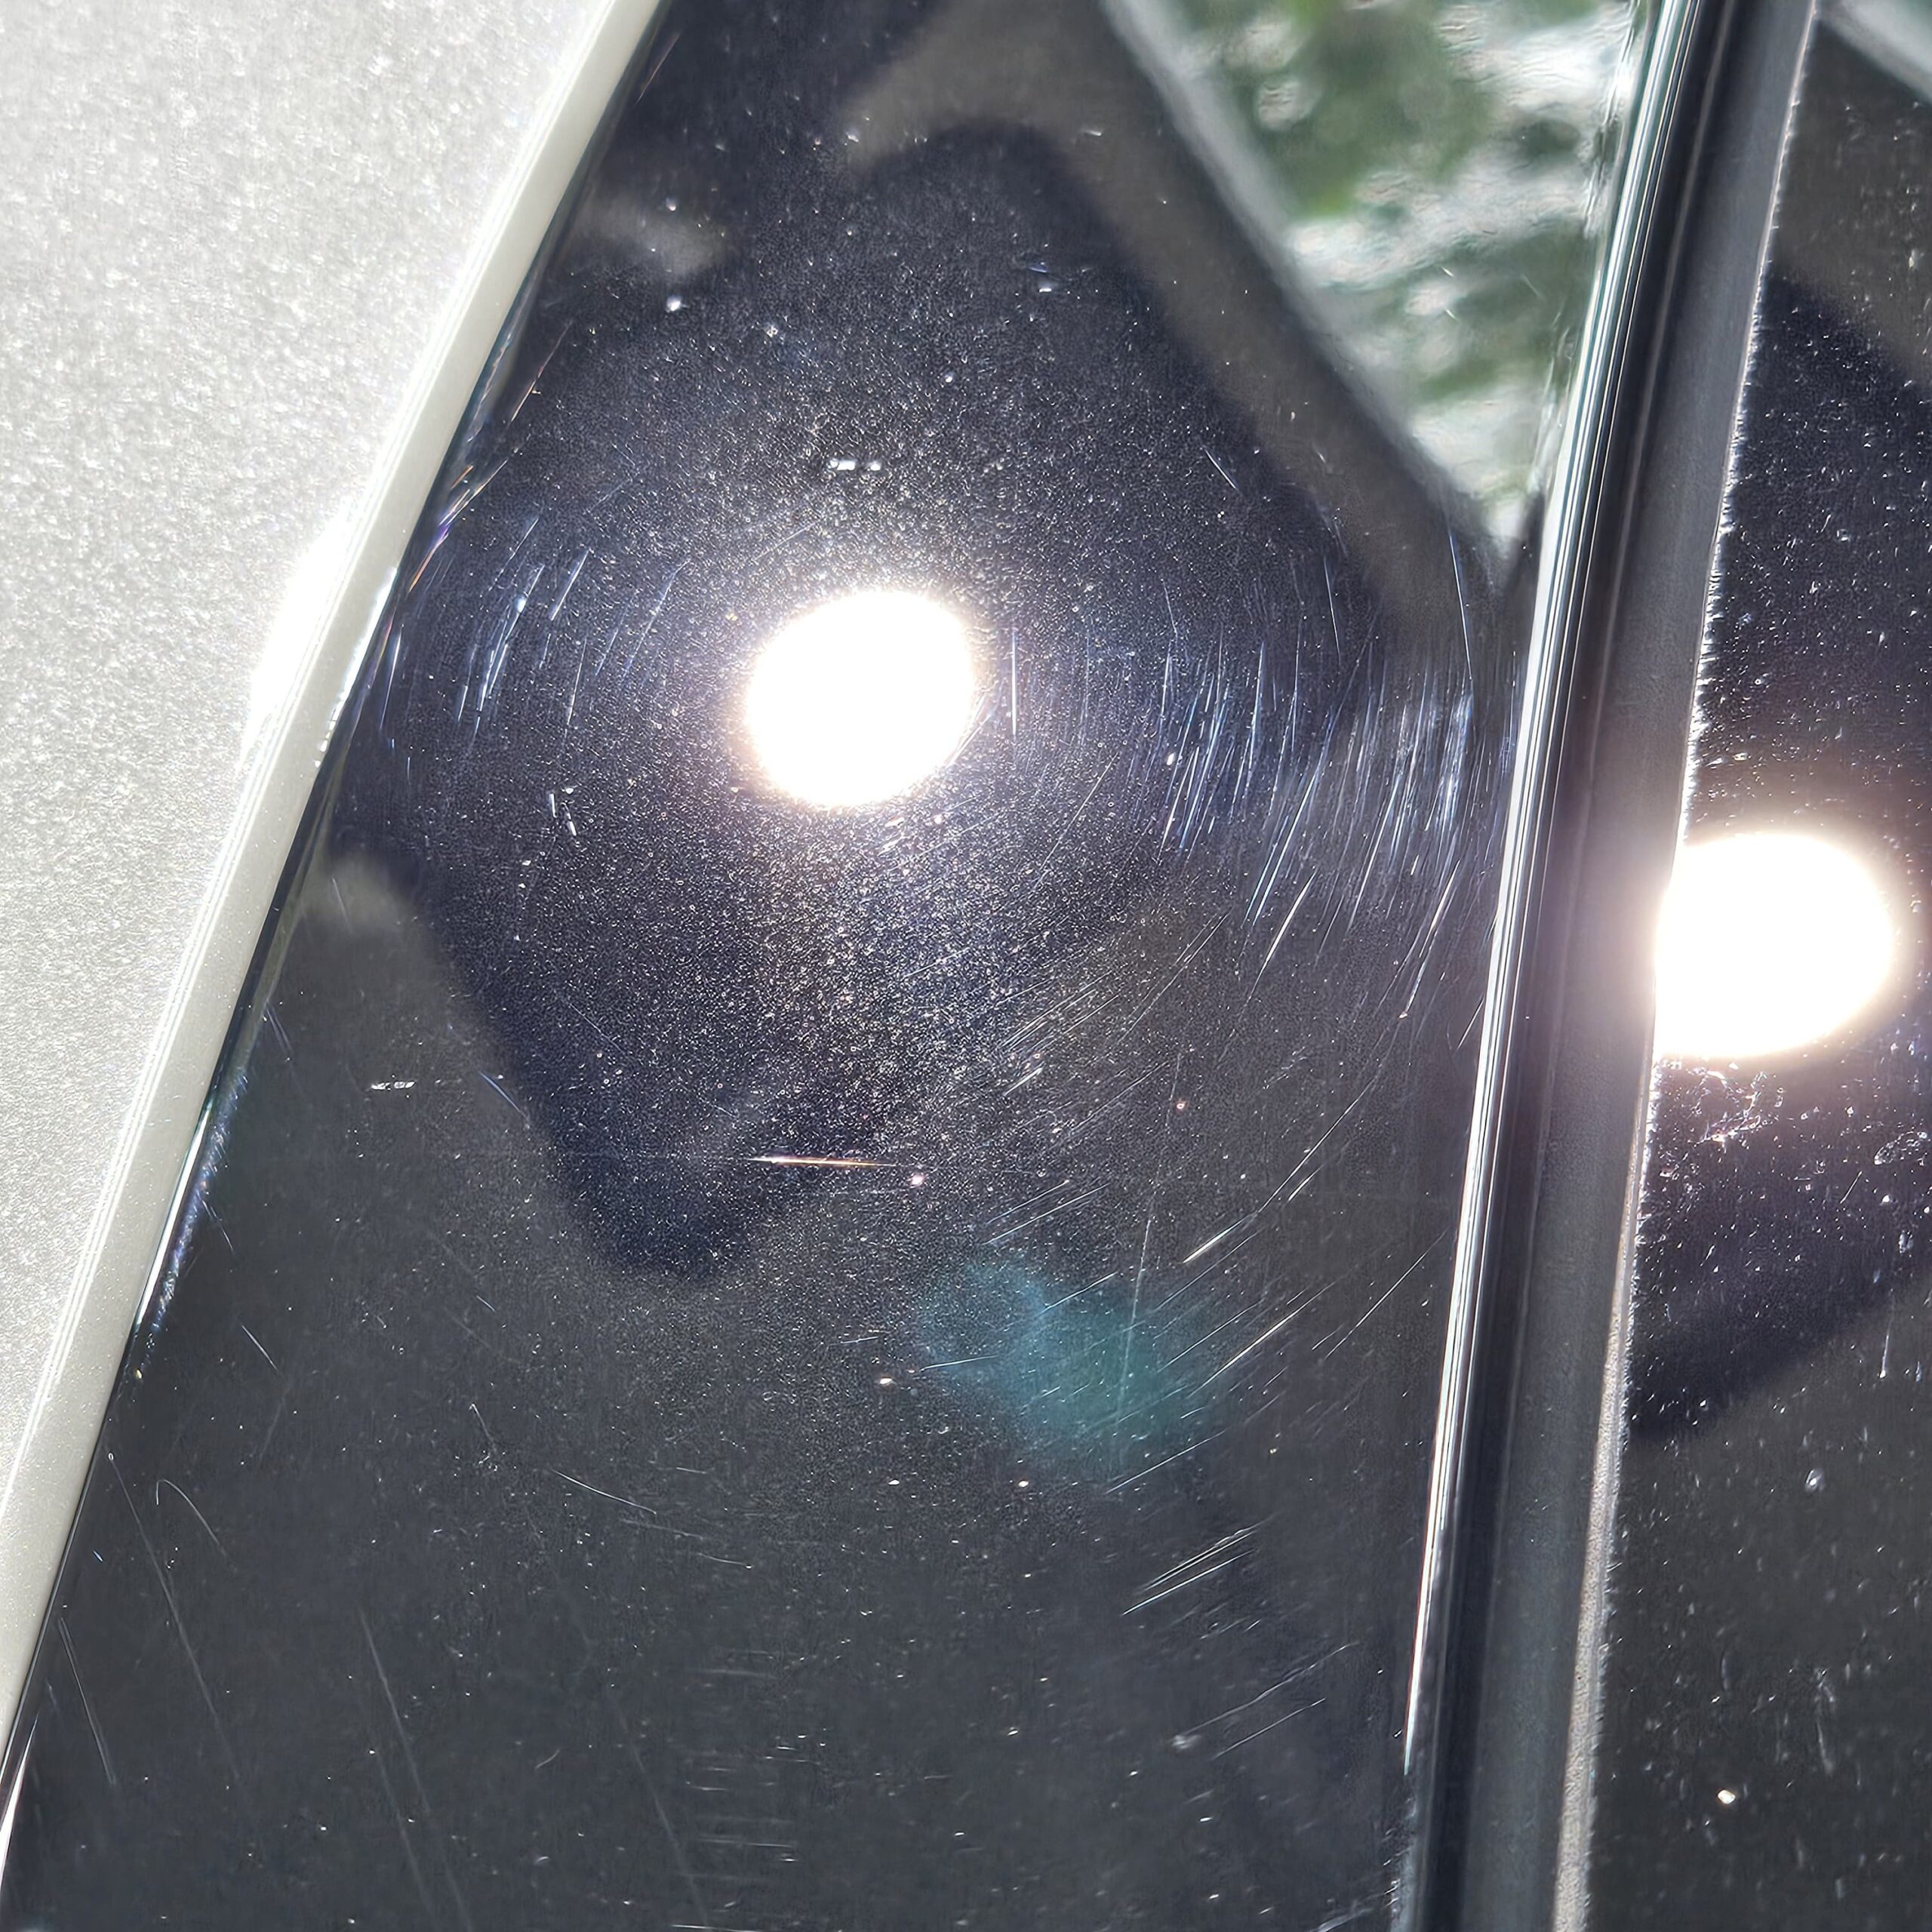
Most paint defects are invisible in shade and obvious in direct sun, because hard light reveals what soft light hides. The before shot shows what your paint actually looks like under proper inspection lighting, swirl marks fanning out around the light source, scratches running through the panel. The after shot is the same panel after multi-stage correction. Same light, same angle, same panel.
Case 03
Audi Q3, the damage you can't usually see
Silver and white paint normally hide damage well, which is why most owners assume their car is fine. This Audi Q3 came in with severe rotary buffer holograms and years of accumulated swirl marks, the kind of damage that takes light-coloured paint and dulls it without the owner realising. Multi-stage correction removed the entire pattern. If silver paint can look like this under inspection lighting, your car probably has more damage than you think.
Know what you're looking at
A quick guide to paint defects
Most people see a swirl mark and call it a scratch. They're not the same, and the right correction depends on knowing the difference. Here's the field guide
Swirl marks
CorrectableFine circular scratches you see when sunlight hits the paint at an angle. Caused by improper washing, cheap sponges, dirty mitts, drive through car washes, drying with the wrong towel.
Holograms
CorrectableA spiderweb pattern visible in direct sun, especially on dark paint. The signature of a rotary buffer in untrained hands. Almost every car that has been "polished" cheaply has these.
Cobwebbing
CorrectableRandom fine scratches running in all directions, looking like spider webs in sunlight. Same family as swirl marks but caused by everyday contact, wiping dust off, brushing past the car, leaning in.
RIDS
Often correctableRandom Isolated Deeper Scratches. The deeper individual scratches you can sometimes catch with a fingernail. Caused by keys, fingernails, road debris, careless contact. Correctable if they're within the clear coat depth.
Water etching
Often correctableHard mineral deposits from water spots that have eaten into the clear coat. Common on the Sunshine Coast where bore water and sea spray are everyday hazards. Light etching corrects out, deeper etching may need wet sanding.
Oxidation
CorrectableDull, chalky, faded clear coat caused by years of UV exposure. Black paint goes grey, red goes pink. The damaged top layer of clear coat is removed during correction, exposing fresh paint underneath.
Bird etching
Sometimes correctableBird droppings are acidic. Left in the sun, they eat into the clear coat in the shape of the dropping. Light etching polishes out; deeper etching has gone through the clear coat and needs paintwork.
Orange peel
Factory textureA subtle dimpled texture that comes from the factory paint application process, like the surface of an orange. Not a defect, technically. Removable with wet sanding, but rarely recommended on factory paint.
Marring
CorrectableA general haze on the paint, sometimes the residue left by aggressive compounds, sometimes a layer of micro scratches. Almost always corrects out with a refining polish on a soft pad.
Common questions
Paint correction, demystified.
The questions Jack gets asked most. If yours isn't here, just call, he'd rather have a quick chat than have you guess
What's the difference between paint correction and a polish?
A "polish" usually means applying a product that fills swirl marks with silicone or oils. It looks great for two weeks, then the fillers wash out and the swirl marks come back exactly as they were.
Paint correction is mechanical. We use a machine polisher and abrasive compound to physically level the clear coat down to a smooth, defect free surface. Once it's corrected, it's corrected. Nothing washes out.
How long does paint correction take?
Single-stage takes around a day. Two-stage is 1–2 days. Three-stage is 2–3 days. Larger vehicles such as 4WDs, vans, dual-cabs sit at the longer end of each range.
We don't rush. The fastest way to ruin paint is to cut corners on time.
Will it remove all my scratches?
Anything in the clear coat, yes, almost always. Swirl marks, holograms, cobwebbing, light scratches, water etching; all correctable.
Anything that's gone through the clear coat into the colour layer such as key marks, deeper gouges, anything you can clearly catch with a fingernail and feel deeply isn't correctable. That's a paint repair, not a correction. Jack will tell you straight which is which during inspection.
Can I get correction without ceramic coating after?
Yes. Plenty of customers do correction as a standalone service, especially on cars that already have a coating that's still working, or on cars they're getting ready to sell.
That said, bare corrected paint is more vulnerable than coated paint. Without protection, the next wash will start re-introducing swirl marks. If you're investing in correction, even a basic sealant or one-year ceramic coating dramatically extends the result.
Do I need correction before ceramic coating?
If your paint has any visible defects in sunlight, yes. A ceramic coating locks in whatever's underneath for years. Coating over swirl marks means living with those swirl marks until the coating wears off.
For brand new cars with very minor dealer induced swirl, a single-stage correction is usually enough. For anything older or more weathered, two-stage is the standard prep before a quality coating.
Will it damage my clear coat?
Done properly, no. Done wrong, absolutely.
Every panel is measured with a digital paint thickness gauge before correction starts. If a panel doesn't have safe clear coat to spare (because it's been resprayed, or already aggressively polished elsewhere), we won't correct it. We'll tell you, document it, and adjust the plan.
Clear coat is a finite resource. The job of correction is to remove the minimum amount needed to get rid of the defects, nothing more.
How often should paint correction be done?
Ideally, once. Then maintained. A proper correction followed by a quality ceramic coating, plus correct washing technique, can keep paint looking corrected for years.
Cars that get washed at drive through car washes or with cheap sponges accumulate swirl marks again within months. How you wash matters more than how often you correct.
Why is correction more expensive than a polish at a regular detailer?
Because what you're paying for is different. A $200 "polish" is one product, one pass, an hour of work, and a result that washes out.
A correction is 1–3 days of work, multiple compounds and pads, a paint thickness gauge, proper inspection lighting, and 17+ years of knowing exactly how much pressure, how many passes, and which pad to use on which paint. It's a different service category, not the same service done slowly.
Let's start with the paint
Send us your car
We'll tell you what it needs
Every paint surface is different, and we don't quote correction sight unseen. Bring your car by the Coolum Beach studio, or send a few photos taken in good direct light, and Jack will inspect the paint, measure the clear coat, and give you a straight answer on what stage you actually need, and what you don't